
Planting
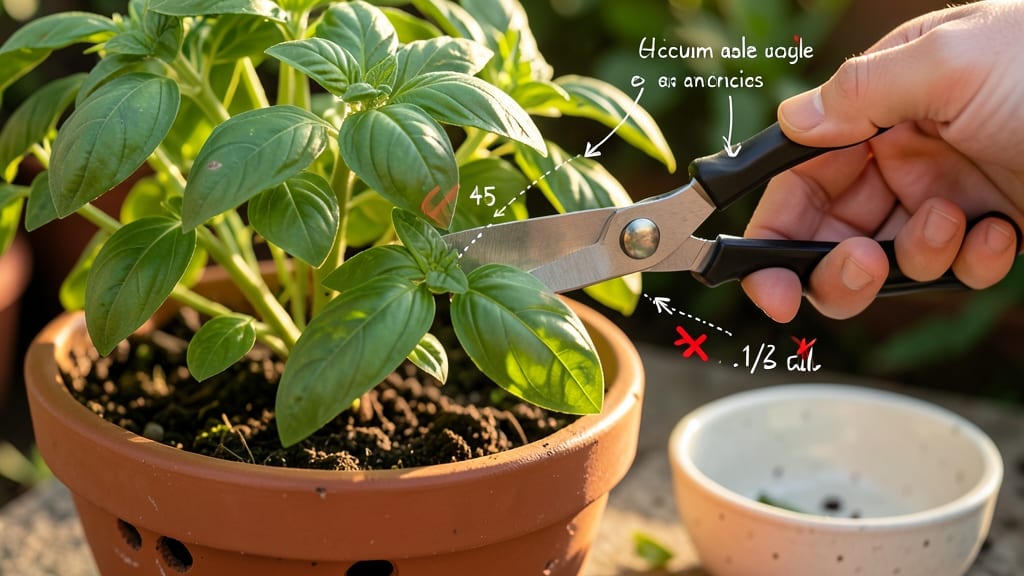
How to cut herbs without killing the plant—your herb garden doesn’t have to be a casualty of the kitchen. ✂️ The right cut—made at the right spot—can transform wispy stems into bushier, more productive plants. I’ve saved more herbs from slow death than I’d like to admit, and the secret lies in understanding where to cut, when, and how much to leave behind.
Start with clean, sharp scissors or pruners (never dull blades—they tear instead of cut). For leafy herbs like basil and cilantro, snip just above a leaf node, where new growth emerges.
Woody herbs like rosemary and thyme need a different approach: trim back by a third to encourage fresh, tender shoots. Over-pruning shows up as bare stems or yellowing leaves—signs your plant is begging for a break.
With the right technique, you’ll see fuller plants within weeks. Basil regrows aggressively when cut back regularly, while rosemary responds to a hard prune in early spring. The key is consistency: a little every few weeks keeps herbs thriving instead of struggling.
And if you’ve ever watched an herb limp after a harsh cut, you’ll understand why precision matters.
This method works for container herbs, window gardens, or full sun plots. The only requirement? Paying attention to how your plants react. Start small—try one herb first—and watch it bounce back. That’s when you’ll know you’ve mastered the art of the snip.
📚 In This Guide
- What you need
- Instructions
- Tips and common mistakes
- Wrapping up and next steps
What you need
- ● Sharp pruning shears or scissors: Use bypass pruners (for larger herbs like basil or rosemary) or small kitchen scissors (for delicate herbs like cilantro or parsley). Dull blades crush stems and invite disease!
- ● Clean, sterilized tools: Wipe blades with rubbing alcohol (70% isopropyl) or a 10% bleach solution before and after use to prevent bacterial spread.
- ○ Gloves (optional but recommended): Lightweight gardening gloves protect against sap irritation (e.g., mint or lemon balm) and keep hands clean.
- ● Container for trimmings: A small bowl or reusable bag to collect cuttings for cooking or composting.
- ○ Water spray bottle (optional): A 16 oz misting bottle with water to dampen soil if herbs are wilted before cutting.
- ● Mature growth: Wait until herbs have 6–8 inches of new growth (or at least 3–4 sets of leaves) before cutting.
- ● Healthy plants: Avoid cutting if herbs show yellowing leaves, wilting, or pests—focus on recovery first!
- ● Time of day: Harvest in the morning after dew dries for peak flavor and moisture.
- ● Herb-specific tools: A pair of micro-snips (e.g., Fiskars Micro-Tip) for precision with tiny leaves like thyme.
- ● Labeling system: Waterproof plant markers to track cutting schedules (e.g., "Last pruned: 5/15").
- ● Compost bin: A small countertop compost pail for herb scraps to reduce waste.
Step-by-Step instructions for pruning herbs without damaging growth
Here's the method I use to keep my herbs thriving while harvesting—no sad, wilted stems here.
✂️ Step 1: Choose the Right Time and Tools
Wait until the morning after a good watering when leaves are fully hydrated and turgid. I always use sharp, clean scissors or pruning shears—dull tools crush stems and invite disease. Wipe blades with rubbing alcohol between cuts to prevent spreading any hidden pathogens.
Never cut more than one-third of the plant at once. This ensures the plant can recover without stress. For example, a basil plant with 12 leaves should only yield 4 leaves in a single harvest. You'll see new growth within 7-10 days if you follow this rule.
🌿 Step 2: Identify the Correct Cutting Points
Look for the leaf node—the point where leaves and stems meet. This is where new growth emerges. Cut just above a node at a 45-degree angle to increase surface area for water absorption. For basil, I always cut above the third set of leaves from the bottom to encourage bushier growth.
For woody herbs like rosemary or thyme, focus on cutting back long, leggy stems to encourage denser foliage. You'll notice these herbs grow wider and fuller after a few strategic cuts. Avoid cutting into the woody base—the plant won't regrow from there.
💧 Step 3: Harvest Strategically for Continued Growth
Start harvesting from the outer leaves first. This prevents shading the inner growth and encourages the plant to fill out. For example, with parsley, I trim the outer stems first, leaving the center leaves to photosynthesize and keep the plant strong.
If you're harvesting leaves (like cilantro or dill), pinch off individual leaves rather than cutting entire stems. This minimizes stress on the plant. You'll see new leaves emerging from the same spot within 2-3 weeks, proving you're not over-harvesting.
☀️ Step 4: Post-Harvest Care for Optimal Recovery
After cutting, water the plant deeply to help it recover from the stress. I use room-temperature water to avoid shocking the roots. Place the plant back in its brightest light location—herbs need 6+ hours of sunlight daily to bounce back quickly.
Remove any yellow or damaged leaves immediately after harvesting. These leaves draw energy from the plant and slow recovery. You'll notice healthier, more vibrant regrowth within 5-7 days if you keep the plant clean and well-lit.
⏰ Step 5: Establish a Regular Harvesting Routine
Herbs thrive with consistent care, so I harvest mine every 2-4 weeks, depending on the type. Basil, for example, grows quickly and needs frequent harvesting to stay productive, while rosemary can go longer between cuts. You'll develop a rhythm that keeps your herbs lush and ready for use.
In cooler months, reduce harvesting frequency by half. Herbs grow slower when temperatures drop, and over-cutting can stress them into dormancy. Watch for new growth as your guide—if you're not seeing fresh leaves within 3 weeks, it's time to cut back.
Tips & tricks for perfect herb pruning
A few small adjustments can transform your herb harvest from a sad, leggy mess to a thriving, productive powerhouse. Here's what I've learned from years of trial and error.
Tool Selection: I can't stress this enough—your cutting tools make all the difference. Beyond sharp scissors or pruning shears, consider investing in a pair of herb-specific pruning shears with a slightly curved blade. These are designed to cut cleanly at the base of stems without crushing. I've ruined more herbs than I'd like to admit using dull kitchen scissors, so always keep a small bottle of rubbing alcohol handy to wipe blades between cuts. This prevents cross-contamination between plants.
Visual Cues for Perfect Cuts: When you're cutting above the leaf node at a 45-degree angle (as mentioned in Step 2), imagine you're creating a tiny landing pad for water. The larger surface area helps water absorb more efficiently, which is crucial for recovery. For basil specifically, I like to use my thumb and forefinger to gently pinch the stem just above the third set of leaves—this creates a natural guide for where to make my cut. The rule of thumb? If you can see the leaf node clearly, you're in the right spot.
Seasonal Adjustments: The instructions mention reducing harvest frequency in cooler months, but I've found that temperature isn't the only factor—daylight hours matter too. In fall and winter, when days are shorter, I switch to a "see one, take one" rule for leafy herbs like parsley and cilantro. For every mature leaf I harvest, I leave at least two others on the stem. This gives the plant enough energy to photosynthesize through the shorter days. In spring and summer, when growth is rapid, I can be more aggressive with my harvesting schedule.
Recovery Signs to Watch For: After pruning, keep an eye out for these three signs that your herbs are recovering well: first, the cut stems should stop oozing sap within 30 minutes (this means the wound is sealing properly). Second, you should see tiny new buds forming at the leaf nodes within 5-7 days. Third, the remaining leaves should perk up and appear slightly darker green as the plant redirects its energy. If you're not seeing these signs within a week, your plant might need more light or a break from harvesting.
Pro Tips for Cut Herbs Without Killing The Plant
- A few small adjustments can transform your herb harvest from a sad, leggy mess to a thriving, productive powerhouse. ...
- Tool Selection: I can't stress this enough—your cutting tools make all the difference. Beyond sharp scissors or pruni...
- Visual Cues for Perfect Cuts: When you're cutting above the leaf node at a 45-degree angle (as mentioned in Step 2), ...
Frequently asked questions
1. How often should I cut my herbs to encourage regrowth?
For most herbs like basil, mint, or cilantro, harvest every 2–4 weeks during active growth (spring to fall). Avoid cutting more than ⅓ of the plant at once—this prevents stress. Woody herbs (e.g., rosemary, thyme) need less frequent trimming (once a year) to avoid stunting. Pro tip: Regular light cuts stimulate bushier growth!
2. Can I cut herbs in the winter, or should I wait for spring?
Winter is a no-go for heavy pruning—herbs are dormant and vulnerable. Light trimming (removing dead or yellowed leaves) is fine, but avoid major cuts until early spring when new growth resumes. Overwintered herbs (like parsley) tolerate minimal snips, but most thrive with patience until warmer weather.
3. What’s the best tool for cutting herbs—scissors, knives, or shears?
Use clean, sharp pruning shears (for stems >¼ inch thick) or small kitchen scissors (for delicate leaves). Avoid dull tools—they crush stems and invite disease. For fine herbs like chives, clean kitchen knives work best. Pro tip: Sterilize tools with rubbing alcohol between cuts to prevent bacterial spread!
4. My herb leaves turned yellow after cutting—did I kill it?
Not necessarily! Yellowing can happen if you cut too close to the base (leave ½ inch above a leaf node) or over-pruned. Ensure the plant gets 6+ hours of sunlight and well-draining soil. If only a few leaves yellow, trim them off—new growth should return in 1–2 weeks. Pro tip: Fertilize lightly after pruning to boost recovery!
5. Are there herbs I should never cut back?
Most herbs love pruning, but perennial woody herbs (like oregano or lavender) need minimal trimming—over-cutting can kill them. For annuals (e.g., dill, cilantro), harvest aggressively to prolong harvest time. Pro tip: Research your herb’s growth habit—some (like lemongrass) regrow from the base, while others (like sage) prefer gentle shaping!
Wrapping up and next steps
Mastering the art of cutting herbs isn’t just about harvesting—it’s about nurturing your plants for long-term lushness.
By using sharp tools, targeting the right spots, and timing your snips wisely, you’ll encourage healthier regrowth and a bountiful harvest. 🌱 Now that you’re armed with these techniques, grab those shears and give your herb garden the care it deserves!
Ready to take it further? Experiment with pruning styles or try growing a new herb—your green thumb is about to level up! ✨