
Watering
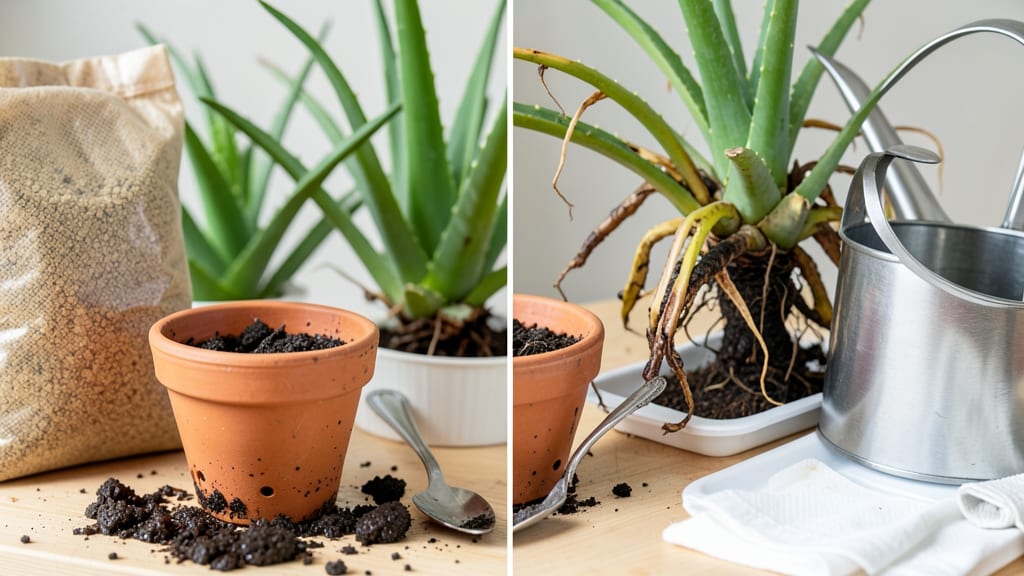
Your aloe's sad, mushy leaves don't mean it's gone—just overwatered. 🌱 I've nursed back dozens of these drought-loving plants, and the fix is simpler than you'd think.
The key is stopping water immediately and letting the roots recover, which can take just days or a few weeks depending on how bad it got.
First, check the roots—if they're black and smelly, trim those away. Repot in fresh, gritty cactus mix to prevent future soggy soil. Then give it a bright spot with indirect light (no scorching sun yet) and wait until the soil is bone-dry before watering again. Patience is everything here.
By week 3, you'll see crisp new growth pushing from the center. The plant will bounce back stronger than before, proving aloes are tougher than they look. Just remember: these desert survivors need water maybe once a month in winter and twice in summer—never on a schedule.
For containers, use pots with drainage holes and a mix designed for succulents. Group aloes together to create their own microclimate, which helps maintain consistent dryness. And always check soil moisture with your finger before watering—this one habit saves more plants than any other.
📚 In This Guide
- What you need
- Instructions
- Tips and common mistakes
- Wrapping up and next steps
What you need
- ● Well-draining potting mix: A cactus or succulent blend (look for labels like "fast-draining" or "sandy soil"). Quantity: Enough to refill the pot (typically 1–3 gallons, depending on pot size).
- ● Clean, breathable pot: Terracotta or ceramic with drainage holes (if repotting). Size: Slightly larger than the current pot (1–2 inches wider).
- ○ Gloves (optional but recommended): To protect your hands from sap and soggy soil. Type: Gardening or nitrile gloves.
- ● Small hand trowel or spoon: For gently removing the plant and loosening compacted roots. Size: 3–5 inches long.
- ● Perforated tray or saucer: To catch excess water during drainage. Size: Larger than the pot’s base.
- ○ Fungicide (optional but helpful): A mild, plant-safe fungicide (e.g., neem oil or hydrogen peroxide solution) to prevent root rot. Ratio: 1 tbsp neem oil per 1 quart water or 1 part 3% hydrogen peroxide to 9 parts water.
- ● Spray bottle: For misting roots lightly if they appear dry or crusty. Size: 8–16 oz.
- ● Paper towels or clean cloth: To pat dry roots if needed.
- ● Rooting hormone: To encourage healthy regrowth if roots are severely damaged.
- ● Calcium carbonate (gardening lime): 1 tsp mixed into soil to adjust pH if your water is hard.
- ● Humidity tray: A shallow tray with pebbles and water (placed under the pot) to maintain slight humidity without soggy soil.
- ● Grow lights or sunny windowsill: Ensure bright, indirect light (6+ hours/day) for recovery.
Step-by-Step instructions for reviving overwatered aloe
Here’s how I nurse back aloe plants—even when their roots are drowning.
💧 Step 1: Stop Watering and Assess the Damage
First, halt all watering immediately. Aloe thrives on neglect, not drowning, and soggy roots can’t recover if you keep feeding them moisture. Let the soil dry out completely—this could take 3-7 days, depending on humidity. Check by sticking your finger 1-2 inches deep; if it feels damp, wait longer.
Gently remove the plant from its pot to inspect the roots. Healthy roots are firm and white, while rotted ones are mushy, dark, or smell foul. Trim away any blackened or squishy roots with clean scissors—this prevents further rot from spreading. Don’t panic if half the roots are gone; aloe is resilient and will regrow.
✂️ Step 2: Repot in Fresh, Drainage-Focused Soil
Use a pot with drainage holes—no exceptions. Aloe despises wet feet, and a container without holes will trap moisture. Fill the bottom 1/3 of the way with fresh, well-draining cactus/succulent mix (never regular potting soil). This mix is designed to wick away excess water and prevent compaction.
Place the aloe plant in the pot and fill around the roots with more of the dry mix, pressing lightly to secure it. Leave 1 inch of space between the soil and the pot’s rim—this prevents water from pooling during your next (very light) watering. If the plant is top-heavy, prop it up with a small pebble or stick until it stabilizes.
☀️ Step 3: Provide Bright, Indirect Light and Zero Humidity
Move your aloe to a spot with bright, indirect sunlight—think east-facing window or a few feet from a south window. Direct midday sun can scorch stressed leaves, but aloe needs light to photosynthesize and recover. If your home is dim, supplement with a grow light 12 inches away for 6-8 hours daily.
Aloe hates humidity, so avoid misting or placing it near steamy showers or humidifiers. Instead, let the air around it stay dry. You’ll know it’s adjusting when new growth appears at the base—this is your signal the plant is turning the corner. Watch for crispy leaf edges; these are normal as the plant sheds excess moisture.
🪴 Step 4: Wait and Water Sparingly
Hold off on watering for 7-10 days to let the roots fully dry out. When you do water, soak the soil thoroughly until water drips from the drainage holes, then empty the saucer immediately. This mimics the aloe’s natural desert conditions—deep watering followed by dry spells. Over the next 2-3 weeks, water only when the soil is bone-dry to the touch.
Resist the urge to fertilize—aloe in recovery mode can’t handle nutrients yet. Instead, focus on light and patience. You’ll see improvement in 3-4 weeks, with new, firm leaves pushing from the base. If the plant stays limp or yellow, it may need more time to regrow roots, but don’t give up—aloe is famously hard to kill.
Tips & tricks for reviving overwatered aloe plants
Real talk: Even the most experienced plant parents overwater aloe sometimes. Here’s how to turn things around without losing your plant.
Drying Time Matters: Those 3-7 days of drying out in Step 1 are non-negotiable. Place the pot on a wire rack or upside-down tray to improve airflow around the roots—this speeds up evaporation without adding moisture. I’ve seen plants recover faster when the soil gets proper airflow, especially in humid climates. If you’re impatient, a small fan on low setting (not blowing directly) can help dry the soil faster while preventing mold.
Root Trimming Technique: When you’re trimming those mushy roots in Step 1, use sterilized scissors or pruners—rusty tools can introduce bacteria. Cut cleanly about 1/4 inch above the rot line, and avoid leaving stubs. After trimming, let the plant air-dry for 10-15 minutes before repotting. This helps prevent any remaining moisture from causing further rot. I’ve saved plants that looked completely hopeless by being thorough here.
Lighting Hack: If you don’t have a south-facing window, a simple LED grow light on a timer works wonders. Position it 12 inches away for 6-8 hours daily as mentioned, but rotate the plant every few days so all sides get equal light. I’ve used old desk lamps with full-spectrum bulbs—just make sure it’s not too close, or you’ll scorch the leaves. Watch for crispy edges as a sign it’s getting too much direct light.
Watering Confidence: After the initial 7-10 day dry-out, resist the urge to water just because the soil looks dry at the surface. Stick your finger 2 inches deep—that’s where the roots are trying to regrow. I’ve seen people water too soon and set their recovery back weeks. Think of it like desert survival: aloe plants are built for drought, not constant moisture.
Pro Tips for Fix Overwatered Aloe
- Real talk: Even the most experienced plant parents overwater aloe sometimes. Here’s how to turn things around without...
- Drying Time Matters: Those 3-7 days of drying out in Step 1 are non-negotiable. Place the pot on a wire rack or upsid...
- Root Trimming Technique: When you’re trimming those mushy roots in Step 1, use sterilized scissors or pruners—rusty t...
Frequently asked questions
Got questions about saving your soggy aloe? You’re not alone—overwatering is a common (and frustrating) plant parent mistake! Here are the answers to the most pressing questions to help you nurse your aloe back to health.
How quickly can I fix an overwatered aloe?
With proper care, you can see improvement in just 3–7 days! Start by letting the soil dry out completely, repotting if needed, and avoiding water for at least a week. Patience is key—aloe is resilient but not magic. Check for root rot daily to monitor progress.
What if my aloe’s leaves are mushy and falling over?
Mushy, collapsing leaves mean root rot is likely. Trim the damaged leaves at the base with sterilized scissors, then inspect the roots. If they’re brown/mushy, remove them entirely and repot in fresh, gritty soil. No roots? No problem! Aloe can regrow from healthy leaves.
Should I move my aloe to a sunny spot immediately?
Not yet! First, let it recover in bright, indirect light for 2–3 days to avoid stress. Once it’s stable (no more drooping or soft spots), gradually reintroduce full sun. Aloe thrives in sunlight, but sudden exposure can shock weakened roots. Think of it like sunbathing after a cold shower—ease into it!
Can I use hydrogen peroxide to save my overwatered aloe?
Yes! Mix 1 part 3% hydrogen peroxide with 4 parts water to sterilize the soil and prevent fungal/bacterial growth. Water lightly at the base (avoid leaves) every 5–7 days until new growth appears. Pro tip: This trick works for both root rot and overwatered stress!
What’s the best soil mix to prevent future overwatering?
Ditch regular potting soil—aloe needs fast-draining, gritty mix. Try:
- 60% cactus/succulent soil
- 30% perlite or pumice
- 10% coarse sand (or orchid bark)
This combo mimics desert conditions and keeps roots happy. Bonus: Add a layer of pebbles at the pot’s bottom for extra drainage.
Wrapping up and next steps
Reviving an overwatered aloe isn’t just possible—it’s a rewarding challenge that strengthens your green thumb! 🌱 By acting quickly with proper drainage, adjusted watering, and patience, you’ll help your plant bounce back in days. Remember, aloes thrive on neglect, so trust the process and avoid overcompensating.
Now that you’re armed with the know-how, take action today—check your aloe’s soil, trim any damaged leaves, and adjust your care routine. Your plant (and future gardening adventures) will thank you! 🌿✨