
Propagation
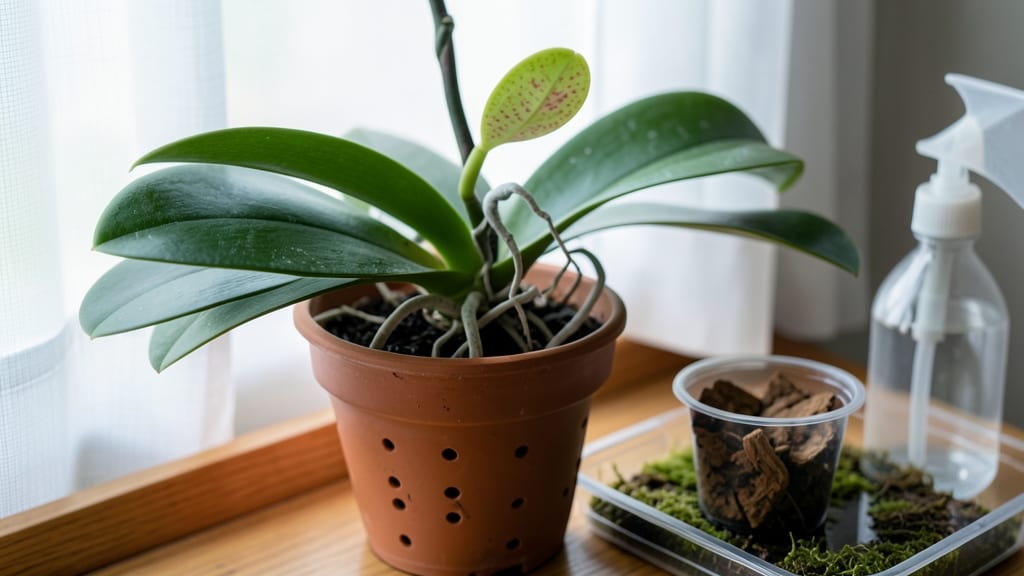
How to grow orchids to form keiki is like unlocking a secret garden in miniature. ✨ The first time I spotted a tiny new shoot on my phalaenopsis, I knew this was the magic of propagation—no fancy tools, just patience and the right conditions. These baby plants, called keiki, grow naturally from mature orchids when they're happy, and with a few simple adjustments, you can encourage them to appear and thrive.
You'll need a healthy orchid plant, a bright spot with indirect light, and a humidity level that feels like a tropical morning. Most people overlook humidity—keep it between 50-70%—and that's where the difference lies.
A simple spray bottle or pebble tray works wonders, or move your orchid to a bathroom with a shower for natural humidity boosts. The right substrate matters too; orchid mixes with bark and sphagnum moss give roots the air circulation they crave.
Once you see those first signs—a tiny bump near a node—you're on your way. Keiki typically take 3-6 months to mature enough for separation, but don't rush it. A healthy keiki should have 3-4 leaves and 2-3 roots before you carefully snip it from the mother plant.
The transition to its own pot is where many fail, but with the right balance of light and water, your baby orchid will flourish independently.
This method works for phalaenopsis, dendrobium, and cattleya orchids, making it versatile for any orchid lover. The best part? You'll soon have multiple plants from just one, turning a single orchid into a thriving collection. Here's how to get started without the guesswork.
📚 In This Guide
- What you need
- Instructions
- Tips and common mistakes
- Wrapping up and next steps
What you need
- ● Mature orchid plant: Choose a healthy Phalaenopsis (moth orchid) with at least 3-4 mature leaves and a sturdy stem.
- ● Keiki inducer: A keiki paste (e.g., Auxin-based rooting hormone) or cinnamon powder (natural alternative).
- ● Sharp, sterilized knife or scissors: For precise cuts (prevents infection).
- ● Small container: A plastic cup (4-6 oz) or mini greenhouse for humidity control.
- ● Sphagnum moss or coconut coir: Moisture-retentive medium (2-3 inches deep).
- ● Plastic wrap or humidity dome: To maintain high humidity (80%+).
- ● Spray bottle: For gentle misting (avoid soaking).
- ● Patience! Keiki growth takes 4-12 weeks depending on conditions.
- ● Grow lights: LED or fluorescent (12-14 hrs/day) for faster growth.
- ● Thermometer/hygrometer: Monitor 75-85°F (24-29°C) temps and 70-80% humidity.
- ● Fertilizer (diluted): Balanced 20-20-20 or orchid-specific feed (every 2-4 weeks).
- ● Tweezers: For delicate handling of tiny keiki.
Step-by-Step instructions for encouraging keiki formation in orchids
Here's the method I've used to successfully grow orchid keiki—no fancy equipment, just patience and precision.
🌱 Step 1: Select a Healthy Mature Orchid
Choose a mature orchid plant with at least 3-4 pseudobulbs and multiple leaves—this ensures it has enough energy to support new growth. Look for a thick, firm stem with no signs of rot or pests. I always pick plants that have recently finished flowering, as they've stored energy in their pseudobulbs for the next growth cycle.
Examine the stem closely for nodes—these are the small bumps where leaves attach. These are the prime spots for keiki to form. Avoid plants that are already stressed from poor light or inconsistent watering, as they won't have the reserves needed to produce keiki.
☀️ Step 2: Provide Ideal Light and Temperature Conditions
Place your orchid under bright, indirect light—think of it as morning sun filtered through a sheer curtain. Too much direct sun will scorch the leaves, while too little will prevent keiki formation. You'll know the light is right when the leaves are a vibrant green, not pale or yellowing.
Maintain temperatures between 65-85°F during the day and 55-65°F at night. A 10-15°F difference between day and night encourages keiki production. If your home stays consistently warm, place the orchid in a cooler spot at night or use a small fan to create airflow—this mimics natural temperature fluctuations.
💧 Step 3: Adjust Watering to Stimulate Growth
Reduce watering slightly to stress the plant just enough to trigger keiki formation. Let the top inch of the potting mix dry out completely between waterings, then soak the pot thoroughly until water runs out the drainage holes. This back-and-forth cycle mimics seasonal droughts and signals the plant to produce offspring.
I use room-temperature water (never cold) to avoid shocking the roots. Mist the leaves lightly once a week to maintain humidity, but avoid letting water pool in the crown of the plant—this can cause rot. You'll see the first signs of success when small bumps appear at the nodes after 4-8 weeks of consistent care.
⏰ Step 4: Encourage Keiki with Hormone Gel (Optional but Effective)
Once you spot tiny bumps at the nodes, apply a small dab of orchid keiki gel (available at garden centers) to each bump. This gel contains natural hormones that encourage root and shoot development. Use a toothpick to apply just a tiny amount—too much can harm the plant or cause the keiki to grow too fast and become weak.
After applying the gel, keep the orchid in its ideal light and temperature conditions. You'll notice the bumps grow into small shoots within 2-4 weeks. Avoid moving the plant during this time, as even slight disturbances can cause the developing keiki to fall off. Patience is key—rushing this step often leads to failure.
🌿 Step 5: Separate and Pot the Keiki
Once the keiki has 3-4 leaves and its own roots (about 3-6 months after formation), it's ready to be separated. Use a clean, sharp knife to cut the keiki from the mother plant, leaving a small section of the stem attached to the keiki. This helps it establish roots more quickly.
Pot the keiki in a small container with orchid-specific potting mix—I use a mix of bark, sphagnum moss, and perlite for the best drainage. Water lightly after potting and place it in a humid, shaded spot for the first 2 weeks to reduce stress. Gradually introduce it to brighter light over the next month as it grows stronger.
Tips & tricks for perfect orchid keiki formation
Real talk: Orchid keiki formation isn't about magic—it's about creating the right conditions and understanding your plant's signals.
Light and Temperature Balance: In Step 2, when setting up your light and temperature conditions, remember that orchids need that 10-15°F difference between day and night to trigger keiki production. I've found that placing my orchids near an east-facing window during the day, then moving them to a cooler spot at night, creates this natural fluctuation without needing fancy equipment. The key is consistency—orchids are sensitive to sudden temperature swings, so avoid placing them near drafts or heat sources like radiators.
Watering Strategy: The 4-8 week window in Step 3 is when you'll see those first promising bumps at the nodes. Here's what nobody tells you—your watering schedule needs to be precise. I've ruined more orchids than I'd like to admit by either underwatering (which stresses the plant too much) or overwatering (which causes rot). The trick is to check that top inch of soil with your finger—if it feels dry, it's time to water. And always use room-temperature water to avoid shocking the roots.
Hormone Gel Application: When you're ready to apply that small dab of orchid keiki gel in Step 4, less is more. I've seen beginners smother the nodes with gel, thinking more equals better. That's a recipe for disaster—the gel can actually burn the plant if used too liberally. Use a toothpick to apply just a tiny amount, and be patient. Those 2-4 weeks after application are critical—the keiki needs stability to develop properly, so avoid moving or disturbing the plant during this time.
Separation Timing: In Step 5, when you're ready to separate your keiki, timing is everything. Wait until you see 3-4 leaves and roots—this shows the keiki has enough energy to survive on its own. I've made the mistake of separating too early, and those delicate babies just didn't make it. Once you do separate, leave that small section of stem attached—it's like a lifeline that helps the keiki establish its own root system more quickly.
Pro Tips for Grow Orchids To Form Keiki
- Real talk: Orchid keiki formation isn't about magic—it's about creating the right conditions and understanding your p...
- Light and Temperature Balance: In Step 2, when setting up your light and temperature conditions, remember that orchid...
- Watering Strategy: The 4-8 week window in Step 3 is when you'll see those first promising bumps at the nodes. Here's ...
Frequently asked questions
Got questions about growing orchid keiki? You’re not alone!
Here are answers to the most common queries—from timing to troubleshooting—so you can propagate like a pro.
How long does it take for a keiki to form on an orchid?
A keiki can take anywhere from 3 months to a year to appear, depending on the orchid type and conditions. Phalaenopsis (moth orchids) often show signs in 6–12 months, while Cattleya or Dendrobium may speed things up with the right care. Patience is key—consistent warmth (75–85°F) and humidity (50–70%) help speed up the process!
Can I force a keiki to grow faster?
While you can’t rush nature, you can optimize conditions to encourage faster growth. Use a keiki paste (like orchid bloom booster) on the node, maintain bright, indirect light, and mist daily. Avoid overwatering—the roots need air! Some growers also wrap the node in sphagnum moss for extra moisture retention.
What if my keiki isn’t growing or looks unhealthy?
Check for these red flags:
- Yellowing leaves → Too much water or poor drainage.
- Wrinkled or shriveled → Underwatering or low humidity.
- No new growth after 6+ months → Try adjusting light (move closer to a window) or increasing warmth.
Do I need to remove the keiki once it’s big enough?
Yes! Once the keiki has 3–4 leaves and 2–3 roots (2+ inches long), it’s ready to separate. Use sterilized scissors to cut it from the mother plant, then pot it in bark mix. Avoid transplanting during flowering—wait until the orchid’s dormant phase for less stress.
Can I grow keiki without air-layering?
Alternative methods include:
- Division: Split mature orchids with multiple pseudobulbs (like Cattleya) to reveal keiki.
- Back-bulb keiki: Some orchids (e.g., Phalaenopsis) grow keiki from the base of old flower spikes.
- Tissue culture: Advanced method for lab-grown keiki (requires specialized equipment).
Wrapping up and next steps
Growing orchids to form keiki is a rewarding journey that blends patience, care, and a little scientific know-how! 🌱 With the right techniques—like air-layering, proper humidity, and gentle nurturing—you’ll soon watch those tiny baby plants sprout and thrive.
Remember, every expert gardener started with a single cutting, so don’t hesitate to experiment and learn from each step.
Ready to take the next leap? Once your keiki are strong enough, transplant them into their own pots and continue nurturing them into stunning, mature orchids. Happy growing—your green thumb is about to get even greener! 🌟