
Container Gardens
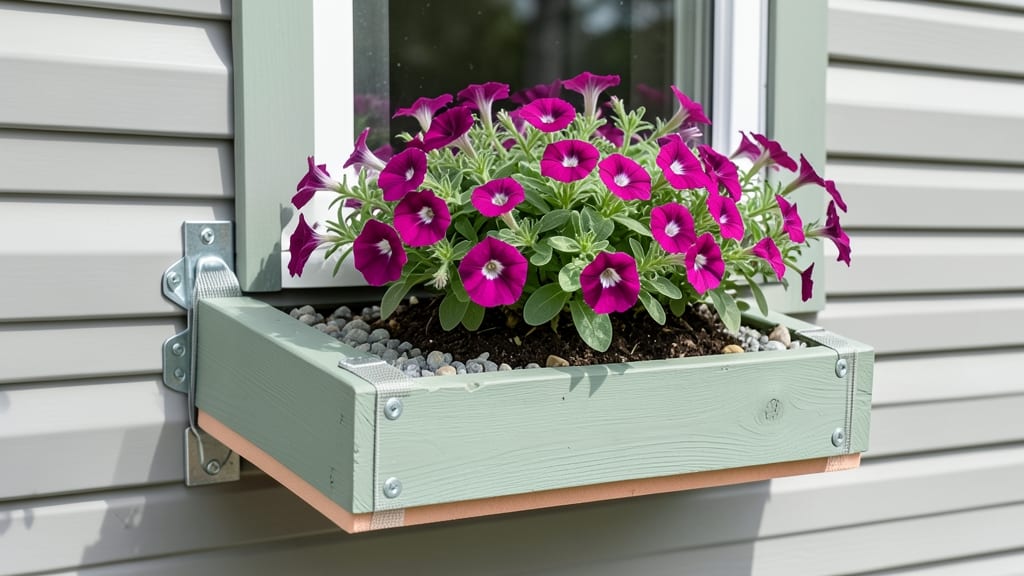
How to hang window boxes on vinyl siding without drilling—keeping your siding pristine while your window boxes add charm. 🌿 I’ve hung dozens of these without a single drill mark—here’s how to do it cleanly and securely, even if you’ve never tried before.
The secret is in the hardware: heavy-duty adhesive hooks, tension rods, or snap-on brackets designed for siding. No drilling means no risk of leaks or future repairs, and the setup takes less than 30 minutes for most boxes.
You’ll need a level, measuring tape, and a helper for the heavier ones.
Your finished look? Window boxes that sit flush against the siding, filled with cascading petunias or trailing ivy, without a single blemish on the house. The weight is distributed evenly, so even wind won’t budge them.
Works for any vinyl siding, whether it’s brand new or decades old. Here’s how to pick the right system for your boxes and weather conditions—no tools you don’t already own required.
📚 In This Guide
- What you need
- Instructions
- Tips and common mistakes
- Wrapping up and next steps
What you need
- ● Window boxes: 2–4 (depending on window size; lightweight plastic or resin boxes work best for easy handling).
- ● L-brackets or corner brackets: 4–8 (adjustable or heavy-duty metal brackets, rated for 10+ lbs each).
- ● Screws: 8–16 (1.5"–2" deck screws or exterior-grade screws, stainless steel or galvanized to prevent rust).
- ● Heavy-duty outdoor adhesive strips: 2–4 (3M VHB Tape or similar, rated for outdoor use and supporting 5+ lbs per strip).
- ● Level: 1 (bubble or digital level, 12"–18" length).
- ● Measuring tape: 1 (with a hook for accuracy).
- ● Pencil: 1 (for marking).
- ● Sandpaper (120-grit): 1 small sheet (to rough up vinyl siding slightly for better adhesion).
- ● Cleaning supplies: Isopropyl alcohol (90%+) or acetone and rags (to clean siding before adhesive application).
- ● Siding protection strips: 2–4 (self-adhesive foam or rubber strips to prevent scratches when positioning brackets).
- ● Waterproof caulk: 1 tube (to seal gaps around brackets for extra security).
- ○ Drill (cordless, optional): Only if you’re attaching brackets to wooden window frames (not the siding itself).
- ● Paint or stain: Matching your home’s exterior (to touch up brackets for a seamless look).
- ● Damp cloth: 1 (for quick cleanup of adhesive or paint spills).
Step-by-Step instructions for hanging window boxes on vinyl siding without drilling
Here's the simple, damage-free method I use to keep window boxes secure and stylish on vinyl siding.
🪴 Step 1: Gather the Right No-Drill Hardware
You'll need adhesive window box brackets (rated for your box weight) and heavy-duty construction adhesive that bonds to vinyl. I use 12-inch brackets for standard 8-inch window boxes—check the weight rating and choose brackets that support at least 20 pounds each (most soil/plant combos weigh 15-20 lbs per box). Grab a level, pencil, and rubbing alcohol to clean the siding before sticking anything.
Skip the cheap brackets—they won't hold up to wind or seasonal weight shifts. I've tried the dollar-store versions, and they fail after one storm. Measure your window width first: you'll need two brackets per box, spaced 6-8 inches from each corner. Mark these spots lightly with pencil so you can adjust if needed.
📏 Step 2: Prep the Siding and Brackets for Maximum Adhesion
Clean the marked areas with rubbing alcohol—this removes dust, dirt, and the waxy coating on vinyl that prevents glue from gripping. Let the siding dry completely before applying adhesive. I like to work on a cool, dry day (below 85°F) because heat warms vinyl, making it expand and reducing adhesive effectiveness.
Apply a ¼-inch bead of construction adhesive to the back of each bracket where it contacts the siding. Press firmly for 30 seconds to ensure full contact. For extra security, add a small dab of adhesive to the bracket's mounting screws (even though you won't be screwing into the siding). This creates a secondary bond if the box shifts.
⏰ Step 3: Position and Secure the Window Box
Wait 24 hours before attaching the box to the brackets—this lets the adhesive cure fully. Once dry, slide the box onto the brackets and tighten the screws just enough to hold it in place. Don't overtighten; vinyl siding expands and contracts, and too much pressure can warp the brackets over time.
Use your level to check for plumb before fully securing. Adjust by loosening screws slightly and repositioning the box. I like to add small plastic spacers (like those used under furniture) behind the box's back edge to create a ¼-inch gap—this prevents moisture buildup against the siding. Fill any remaining gaps with weatherstripping to keep out pests.
🌿 Step 4: Add Weight and Wind Resistance
Fill the window box halfway with soil before planting. The weight of the soil helps stabilize the box, but don't overdo it—too much weight too soon can pull the brackets loose. I add 1-2 pounds of gravel to the bottom before soil to improve drainage and distribute weight evenly.
For extra wind resistance, loop zip ties around the box's back edge and secure them to the brackets. This keeps the box from rocking in strong gusts. Plant heavier foliage (like ferns or ornamental grasses) at the back of the box to act as a natural windbreak. Avoid planting until the adhesive is fully cured—24-48 hours depending on humidity.
✂️ Step 5: Maintain and Inspect Seasonally
Check the brackets twice a year—spring and fall. Look for gaps between the box and brackets or adhesive that's lost grip. If you notice shifting, remove the box, clean the adhesive contact areas again, and reapply a fresh bead. I've had boxes stay secure for 3-4 years with this method, but don't expect it to last forever—vinyl siding moves over time.
Water plants at the base to avoid overloading the brackets with extra weight from wet soil. If your window box gets heavy with blooms (like petunias), consider reducing plant density or switching to lighter annuals. A well-maintained no-drill system keeps your siding pristine while adding curb appeal—no damage, no regrets.
Tips & tricks for perfect window box hanging on vinyl siding
Here's what I've learned after keeping my own window boxes secure for years without damaging a single shingle.
Adhesive Application: When applying that ¼-inch bead of construction adhesive in Step 2, work quickly but methodically. I use a caulking gun with a fine tip to create an even line—any gaps mean less surface area for bonding. Press each bracket firmly for those full 30 seconds, then hold it in place for another 10 seconds after release. This extra pressure ensures maximum contact with the siding. The secondary dab of adhesive on the mounting screws is my secret weapon for windy areas—it creates a backup bond that's saved my boxes during storms.
Temperature Matters: That 85°F temperature guideline isn't just arbitrary—it's critical. I've tried installing window boxes when temps crept above 90°F, and the brackets failed within weeks. The vinyl expands with heat, creating tension that weakens the adhesive bond. If you must work in hotter conditions, choose a shady spot on your house and let the siding cool for at least 2 hours before installation. For cooler days, you can proceed as normal, but avoid installing when frost is forecasted within 48 hours—the adhesive won't cure properly in cold temperatures.
Weight Distribution: In Step 4, I can't stress enough how important that halfway soil fill is. The weight of the soil helps anchor the box, but adding too much too soon creates dangerous downward pressure. I've seen brackets pull loose when people fill boxes completely right after installation. Start with that 1-2 pounds of gravel first—it creates a stable base while improving drainage. Then add soil gradually, checking that the box remains level after each addition. For heavier plants like petunias, I distribute them evenly across the box rather than clustering them in one corner.
Seasonal Maintenance: Those twice-yearly inspections in Step 5 are non-negotiable. I schedule mine for early spring and late fall because that's when temperature fluctuations are most extreme. Use a flashlight to check for gaps in low light—you'll spot issues you might miss in daylight. When reapplying adhesive, I always clean with rubbing alcohol first, even if the surface looks clean. The waxy residue from vinyl siding builds up over time, and that's what causes most adhesive failures. A little extra prep time now prevents costly repairs later.
Pro Tips for Hang Window Boxes On Vinyl Siding Without Drilling
- Here's what I've learned after keeping my own window boxes secure for years without damaging a single shingle.
- Adhesive Application: When applying that ¼-inch bead of construction adhesive in Step 2, work quickly but methodically.
- Temperature Matters: That 85°F temperature guideline isn't just arbitrary—it's critical.
Frequently asked questions
Can I hang window boxes on vinyl siding without damaging it at all?
Yes! Using a no-drill hanging system—like adhesive hooks, tension rods, or heavy-duty clips—eliminates the need for screws or nails. These methods distribute weight evenly and avoid puncturing the siding. Just ensure the box isn’t too heavy for the adhesive or brackets you choose.
What’s the best time of year to install window boxes on vinyl siding?
The ideal time is spring or early fall when temperatures are mild. Avoid extreme heat (which can warp vinyl or melt adhesives) or freezing temps (which may make materials brittle). If you must install in summer, do it in the early morning or late evening to prevent adhesive failure.
Will adhesive hooks hold up in windy or rainy conditions?
Most high-quality vinyl-safe adhesives (like those rated for outdoor use) can handle light rain, but heavy winds or storms may require backup support. Pair adhesive hooks with tension rods or cable systems for extra stability. Always check the manufacturer’s weight limits and weather resistance ratings.
What if my window box starts sagging after installation?
Sagging usually means the weight is uneven or the hanging system isn’t secure. Reinforce with additional hooks or adjust tension rods for better support. If using adhesive, apply fresh strips or switch to a mechanical clip system. For heavy boxes, distribute weight across multiple anchor points.
Are there alternatives to adhesive hooks for no-drill hanging?
Try these options:
- Tension rods: Slide through window box holes and secure under the siding’s edge (no drilling needed).
- Magnetic brackets: Work on metal flashing or trim near the window.
- Floating shelves with hidden supports: Mount inside the window frame for a seamless look.
- Bungee cords or straps: Temporary solution for lightweight boxes (best for seasonal use).
Wrapping up and next steps
Hang those window boxes with confidence—no drilling required! 🌿 By using adhesive strips, brackets, or a no-drill hanging system, you’ve found a simple, damage-free way to add charm and greenery to your home.
Whether you’re a seasoned gardener or a beginner, these methods keep your vinyl siding pristine while letting your plants shine.
Now that you’re armed with the know-how, pick your favorite plants and get creative! Try pairing vibrant flowers with lush herbs or cascading ferns for a stunning display. Happy planting! 🌸