
How To
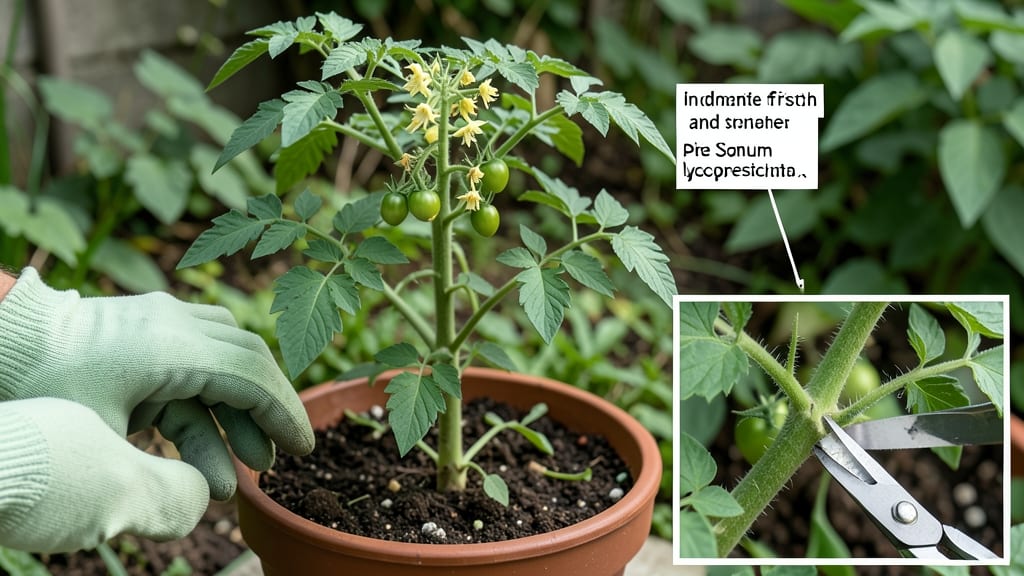
Pinching plants isn't pruning—it's hacking their growth code. ✂️ That tiny pinch at the right spot turns leggy seedlings into bushy powerhouses, packed with more flowers or fruit.
I've used this trick to turn my tomato plants from sad sticks into productive bushes, and it works on basil, petunias, and even herbs you thought needed no help.
The secret is timing and technique. You'll want to pinch just as the plant develops its first set of true leaves (not the tiny seed leaves) and before it flowers.
Use clean fingers or small pruners to snip just above a leaf node—that's where new branches will burst out. No fancy tools needed, just a sharp pair of scissors or your fingers if you're gentle.
What you end up with is a plant that branches out like crazy, producing 2-3 times more blooms or fruit than unpinched plants. My basil went from one sad stem to a full bush that kept me in pesto all summer.
The key is patience—you're trading short-term height for long-term productivity, and the results speak for themselves.
This works for vegetables, flowers, and herbs alike, and it's perfect for small spaces where you want maximum yield. Just don't pinch too late in the season—you'll delay flowering and harvest. Here's how to do it right the first time.
📚 In This Guide
- What you need
- Instructions
- Tips and common mistakes
- Wrapping up and next steps
What you need
- ● Healthy young plants: Choose plants that are not yet flowering (e.g., tomatoes, basil, or herbs like mint). Aim for plants that are 6–12 inches tall with at least 4–6 sets of true leaves.
- ● Clean, sharp pruning shears or scissors: Use sterilized tools (rubbing alcohol or bleach solution) to prevent disease. Avoid dull tools—they can crush stems.
- ○ Gloves (optional but recommended): Protect your hands from thorns (e.g., roses) or sap (e.g., milkweed). Choose gardening gloves with good grip.
- ● Growing medium (if repotting): If you’re rooting pinched cuttings, prepare a well-draining mix (e.g., 50% perlite + 50% peat moss or coconut coir).
- ● Horticultural tweezers: For delicate pinching (e.g., succulents or small herbs).
- ● Pruning sealant: A tree wound dressing (like Tanglefoot) to seal larger cuts on woody plants (e.g., shrubs).
- ● Rooting hormone: Speeds up root growth for cuttings (e.g., 1% IBA powder).
- ● Spray bottle with water: Keeps cuttings hydrated if rooting them.
- ● Plant markers: Label cuttings if you’re experimenting with different varieties.
Instructions for pinching plants: the simple trick for bushier growth
Here's the foolproof method I use to transform leggy seedlings into sturdy, flowering powerhouses.
🌱 Step 1: Identify the Right Time and Growth Stage
Pinch plants when they reach 4-6 inches tall and have 4-6 true leaves—those are the little leaves after the initial seed leaves. This is when the plant has enough energy to branch out. I always check for healthy, vibrant green leaves before pinching; yellow or weak leaves mean the plant isn't ready yet.
Real talk: Don't pinch too early. If you do, you'll stunt the plant's growth instead of encouraging it. Wait until the stem is firm to the touch and the leaves feel sturdy. This ensures the plant has the energy to produce new branches after the pinch.
✂️ Step 2: Locate and Pinch the Terminal Bud
Find the topmost set of leaves—they'll have a small point growing between them called the terminal bud. This is the growth tip that drives the plant upward. Using your thumb and forefinger, gently pinch off this top bud just above a set of leaves. You'll feel a slight resistance as you snap it off cleanly.
I know it seems weird, but trust me—removing this bud sends a signal to the plant to produce new side shoots. If you're unsure where to pinch, look for the tiny bump between the leaves. That's your target. A sharp pair of clean scissors works too if you're squeamish about pinching.
🌿 Step 3: Encourage Side Growth With Proper Care
After pinching, give your plant bright, indirect light for a few days to help it recover. Too much direct sun right after pinching can stress the plant. You'll notice new buds forming at the leaf axils (the spots where leaves meet the stem) within 7-14 days—that's your reward for the pinch.
Here's the thing—pinching alone won't work if the plant isn't getting enough light or nutrients. Keep the soil moist but not soggy, and fertilize lightly with a balanced fertilizer every 4-6 weeks. You'll see the difference in just a few weeks: instead of one tall stem, you'll have a bushy plant with multiple branches.
⏰ Step 4: Repeat for Maximum Bushiness
Once your plant has developed 4-6 new branches from the first pinch, it's time to repeat the process. Pinch the terminal buds on the strongest new branches to encourage even more growth. This is where the magic happens—each pinch creates more opportunities for flowers or fruit to develop.
I like to pinch my plants every 4-6 weeks during the growing season. For flowering plants like tomatoes or peppers, stop pinching once flowers appear—you want those energy resources to go to blooms, not new growth. Watch for new growth emerging from the leaf axils after each pinch; that's your sign it's working.
🌱 Step 5: Maintain and Monitor Growth
After pinching, keep an eye on your plant's progress. You'll want to monitor for any signs of stress, like yellowing leaves or wilting. If this happens, it might be due to overwatering, underwatering, or not enough light. Adjust your care routine accordingly—healthy plants respond best to pinching.
This is the moment that matters: when your plant starts looking full and bushy instead of leggy. You'll see more flowers, more fruit, and a plant that's much easier to manage. Pinching isn't just about looks—it's about giving your plant the best chance to thrive. Keep at it, and you'll have a garden full of happy, productive plants.
Tips & tricks for pinching plants
This simple technique transforms leggy plants into bushy, productive powerhouses—here's how to get it right every time.
Timing is Everything: The 4-6 inch height and 4-6 true leaves rule is non-negotiable for best results. I've seen beginners pinch too early and end up with stunted plants that never recover. Think of it like giving your plant a haircut—you want enough length to work with, but not so much that you're cutting into the main stem's energy reserves. That firm stem check is your secret weapon: if it bends slightly but springs back, it's ready.
Pinch Like a Pro: When you're ready to pinch that terminal bud, use clean fingers or sharp scissors. I always make the cut just above a set of leaves to encourage new growth from that leaf axil. The slight resistance you feel when pinching is your confirmation—it means you've hit the right spot. Pro tip: If you're nervous about pinching, try snipping with scissors first to get the feel before going finger-first.
Recovery Matters: That 7-14 day window for new buds to appear is when your plant is most vulnerable. Too much direct sun during recovery can stress the plant, so bright indirect light is key. I like to move my newly pinched plants to a spot where they get morning sun and afternoon shade. And remember—the 4-6 week fertilization schedule becomes even more important after pinching, as your plant needs extra nutrients to support all that new growth.
Know When to Stop: For flowering plants like tomatoes or peppers, the golden rule is to stop pinching once flowers appear. You want all that plant energy going to fruit production, not new leaves. I've learned this the hard way—once I pinched my tomato plants right before flowering and ended up with half the usual yield. Watch for those new buds at the leaf axils as your signal that the pinch worked.
Pro Tips for Pinch
- This simple technique transforms leggy plants into bushy, productive powerhouses—here's how to get it right every time.
- Timing is Everything: The 4-6 inch height and 4-6 true leaves rule is non-negotiable for best results. I've seen begi...
- Pinch Like a Pro: When you're ready to pinch that terminal bud, use clean fingers or sharp scissors. I always make th...
Frequently asked questions
Got questions about pinching plants? You’re not alone! Here are some of the most common concerns—plus quick, actionable answers to keep your plants thriving.
What’s the best time of year to pinch my plants?
The ideal time is early spring (for warm-season plants) or late winter (for cool-season varieties), when new growth is just starting. Avoid pinching during extreme heat or cold—plants need energy to recover. For annuals like petunias or geraniums, pinch in early summer to encourage bushier blooms before they flower.
How much should I pinch off? Is there a rule?
Pinch off just the tips of stems, usually ¼ to ½ inch above a leaf node (where leaves meet the stem). For most plants, this means removing 1–2 sets of leaves. Overdoing it stresses the plant—think of it like a haircut: a little goes a long way! Pro tip: If your plant is leggy, pinch multiple stems to balance growth.
How long does it take to see results after pinching?
Patience is key! You’ll notice new side shoots in 2–4 weeks, but fuller growth takes 6–8 weeks. Some plants (like tomatoes or basil) respond faster, while woody shrubs may take longer. Keep an eye out for yellowing leaves—that’s a sign of stress, not progress.
Can I pinch dead or diseased stems?
Pinching is a great way to remove dead, yellow, or diseased growth while encouraging healthy new shoots. Just sterilize your pruners with rubbing alcohol first to prevent spreading issues. Warning: If the plant is heavily infected (e.g., powdery mildew), pinch out affected areas last and dispose of clippings in the trash, not compost.
What if my plant doesn’t seem to like being pinched?
Not all plants need pinching—succulents, cacti, and some herbs (like oregano) don’t respond well. If your plant wilts, drops leaves, or stops growing, you may have pinched too much or too late. Alternatives: Try topping (cutting back harder) for leggy plants or thinning crowded stems instead. Observe your plant’s natural growth habits!
How often should I pinch my plants?
For most annuals and perennials, 1–2 pinches per growing season is plenty. Woody plants (like roses or shrubs) might only need pinching once every 2–3 years. Over-pinching can stunt growth, so focus on strategic spots rather than constant trimming. Think of it like shaping a topiary—less is more!
Wrapping up and next steps
Mastering the art of pinching plants is a simple yet powerful way to unlock bushier foliage, more vibrant blooms, and healthier growth—no green thumb required! 🌿 Whether you're nurturing herbs, flowers, or veggies, this technique takes just minutes and yields big rewards.
Start with confidence: grab your pruners, pick a sunny day, and watch your plants thrive.
Ready to level up your gardening game? Try pinching one plant this week and observe the difference in just a few weeks. Happy growing—your future harvest (or bouquet!) will thank you! 🌸