
Propagation
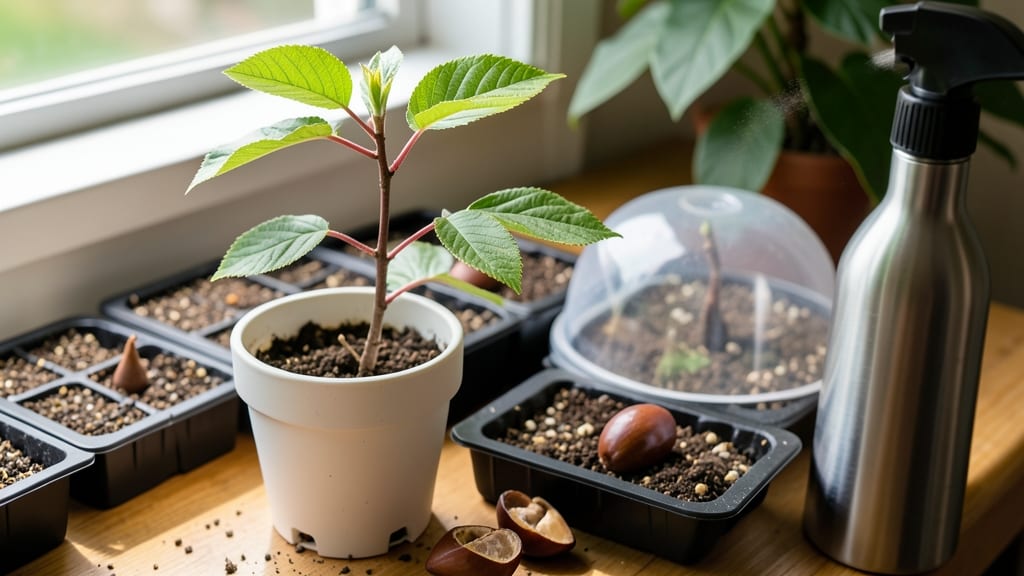
How to grow cherry seeds from pits takes patience, but the reward is a tree with roots in your backyard. 🌱 I’ve struggled with slow germination before—until I discovered cold stratification, which cuts weeks off the wait. The key is mimicking winter’s natural process to trick the seed into thinking it’s ready to grow.
You’ll need just a few supplies: fresh pits, damp paper towels, a sealed plastic bag, and a fridge for 6-8 weeks of cold treatment. Skip this step, and you might wait months (or never see sprouts). The process is simple, but timing is everything—start in late fall for spring planting.
By spring, you’ll see tiny roots breaking through, ready for soil. Plant them in well-draining pots with sandy loam, and keep them moist but not soggy.
The seedlings grow slowly at first, but with consistent care, you’ll have a sturdy young tree in 2-3 years—though edible fruit may take a decade.
Fair warning: most store-bought cherries won’t produce fruit true to the parent tree. For edible varieties, use seeds from heirloom or self-pollinating cherries. The real magic is watching that first leaf unfurl—proof your patience paid off.
📚 In This Guide
- What you need
- Instructions
- Tips and common mistakes
- Wrapping up and next steps
What you need
- ● Fresh cherry pits: 5–10 clean, undamaged pits from sweet cherries (sour cherries may not yield true fruit). Harvest from ripe, healthy fruit.
- ● Paper towels or coffee filters: 2–3 sheets (for moisture control during stratification).
- ● Ziplock bag or airtight container: 1 medium-sized (quart or larger) with a sealable closure.
- ● Refrigerator: A standard fridge (35–40°F / 2–4°C) for cold stratification.
- ● Potting soil: 1–2 gallons of well-draining, sterile seed-starting mix (avoid garden soil—it may harbor pathogens).
- ○ Small pots or seed trays: 3–5 (3–4 inches deep) with drainage holes. Optional: Use biodegradable pots for easy transplanting.
- ● Spray bottle: 1 (for gentle watering).
- ● Plastic wrap or humidity dome: 1 sheet (to retain moisture during germination).
- ● Grow lights or sunny windowsill: Access to 6–8 hours of indirect light daily (south-facing window or LED grow lights).
- ● Plant labels & marker: To track varieties and planting dates.
- ● Hydrogen peroxide (3%) or cinnamon: To disinfect pits before stratification (reduces mold risk).
- ● Moisture meter: For precise soil moisture tracking during germination.
- ○ Heating mat: (Optional for speeding up germination in cooler climates—set to 70–75°F / 21–24°C).
- ● Fertilizer (balanced, water-soluble): Diluted to half-strength for young seedlings (e.g., 5-5-5 NPK).
- ● Garden journal: To log progress, dates, and observations.
- ● Outdoor hardening-off setup: Shade cloth or a sheltered area for acclimating seedlings before transplanting.
Step-by-step instructions for growing cherry seeds from pits
Here's my proven method for breaking dormancy and getting those stubborn pits to sprout reliably.
🌱 Step 1: Extract and Clean the Seeds
Start by carefully cracking open the cherry pits using a nutcracker or rolling pin. I always wear gloves—cherry pits contain cyanogenic glycosides that release cyanide when crushed, though the amount in whole pits is minimal. Extract the single seed inside each pit and rinse it thoroughly under cool water to remove any remaining fruit pulp.
Lay the clean seeds on a paper towel to dry completely for 24 hours. This prevents mold from forming during stratification. You'll know they're ready when the seed coat feels dry to the touch and no moisture remains on the surface. I like to place them in a single layer on the towel so they don't stick together.
❄️ Step 2: Cold Stratify for Dormancy Break
Place the dried seeds in a sealed plastic bag with a small amount of slightly damp sand or peat moss—just enough to surround them without compacting. The moisture level should feel like a wrung-out sponge: damp but not soggy. Seal the bag and refrigerate for 8-12 weeks at 35-45°F.
Check the bag every 2 weeks—if condensation forms on the inside, open it briefly to air out. The goal is consistent moisture without creating an anaerobic environment. I mark the bag with the start date so I don't forget about it. This cold period mimics winter conditions and breaks the seed's natural dormancy.
☀️ Step 3: Plant in Well-Draining Soil
After stratification, plant the seeds ½ inch deep in a mix of 50% potting soil and 50% perlite or coarse sand. I use small 2-inch pots for each seed to prevent overcrowding. Water gently until the soil feels uniformly moist but not waterlogged—you should see moisture bead on the surface but not pool.
Place the pots in a warm, bright location with 65-75°F daytime temperatures and 55-65°F nights. A seedling heat mat helps maintain consistent warmth. Germination typically takes 3-6 weeks, but be patient—some seeds may take longer. Keep the soil lightly moist during this period, watering only when the top inch feels dry.
🌿 Step 4: Transplant and Provide Support
Once seedlings reach 4-6 inches tall and develop their first true leaves, transplant them into larger 4-inch pots with fresh potting mix. Cherry seedlings grow slowly at first, so don't rush this step. I always harden them off for 1 week before moving outside by placing them in a sheltered spot for increasing durations each day.
Cherry trees need strong support as they grow. Install a small stake or bamboo support at transplanting and tie the main stem loosely with soft garden twine. This prevents wind damage and encourages upright growth. Keep the soil consistently moist but never soggy—cherry seedlings are prone to root rot if overwatered.
⏰ Step 5: Gradually Acclimate to Outdoor Conditions
After the last frost date, move your seedlings outdoors to a partially shaded area for 2-3 hours the first day. Gradually increase their exposure over 10-14 days, moving them to full sun by the second week. I watch for signs of stress like wilting or yellowing leaves—these indicate they're not ready for full sun yet.
Once hardened off, plant your cherry seedlings in their permanent location with 15-20 feet between trees for proper air circulation. Mulch around the base with 2-3 inches of organic material to retain moisture and suppress weeds. Remember, cherry trees take 5-7 years to bear fruit, but proper care now ensures a healthy, productive tree later.
Tips & tricks for fast cherry seed sprouting
These little-known details will help you bypass common pitfalls and get those cherry seeds sprouting faster than ever.
Safety First: I can't stress this enough—always wear gloves when handling cherry pits. The cyanogenic glycosides release cyanide when crushed, and while whole pits contain minimal amounts, cracked seeds release more. Work in a well-ventilated area, and wash your hands thoroughly after handling. The 24-hour drying period in Step 1 also helps reduce any residual risk by removing moisture that could accelerate chemical reactions.
Stratification Shortcut: If you're short on time but still want to maximize germination rates, consider using a commercial seed stratification kit instead of DIY sand/peat moss. These kits maintain precise moisture and temperature levels automatically. Just follow the manufacturer's instructions for the 8-12 week period at 35-45°F—it's worth the investment for impatient gardeners. The key is maintaining that consistent cold, damp environment without the guesswork of DIY moisture management.
Soil Mix Secrets: For Step 3, I've found that adding a handful of worm castings to your 50/50 potting soil and perlite mix gives seedlings a nutrient boost right from the start. The castings improve soil structure while providing gentle, balanced nutrition that young roots can access immediately. This doesn't change the planting depth (still ½ inch), but it does help seedlings establish faster during the critical 3-6 week germination window. Just be sure to sterilize the castings first by baking them at 200°F for 30 minutes to kill any pathogens.
Germination Timeline: The 3-6 week germination window can feel like an eternity, but there are visual cues to watch for. After about 2 weeks, you might notice the seed coat splitting slightly—this is a good sign! True germination happens when you see the first true leaves (not the initial seed leaves) appear. If you're not seeing any activity after 6 weeks, don't give up—some seeds may take up to 8 weeks, especially if they were stored improperly before stratification.
Pro Tips for Grow Cherry Seeds From Pits
- These little-known details will help you bypass common pitfalls and get those cherry seeds sprouting faster than ever.
- Safety First: I can't stress this enough—always wear gloves when handling cherry pits. The cyanogenic glycosides rele...
- Stratification Shortcut: If you're short on time but still want to maximize germination rates, consider using a comme...
Frequently asked questions
Got questions about growing cherry trees from pits? You’re not alone—this process can feel tricky at first! Below, we’ve rounded up the most common queries to help you navigate the journey from seed to sapling with confidence.
How long does it take for cherry pits to sprout?
Patience is key! After cold stratification (6–8 weeks in the fridge), germination typically takes 4–12 weeks in warm, moist soil. Some varieties may sprout faster, while others take longer—consistency in warmth (70–75°F) and moisture speeds things up. Keep the soil damp but not soggy!
Can I skip cold stratification and just plant the pit directly?
We don’t recommend it—cherry seeds require stratification to break dormancy. Without it, germination rates plummet (or may not happen at all!). If you’re short on time, try a shortcut: soak pits in warm water for 24 hours before stratifying to jumpstart the process.
Will my homegrown cherry tree produce edible fruit?
Probably not—most cherry trees grown from pits are wild types and may yield small, tart, or inedible cherries. For sweet, reliable fruit, grafted varieties (like ‘Bing’ or ‘Rainier’) are the way to go. Save pit-growing for ornamental trees or experimental fun!
What’s the best indoor setup for germinating cherry pits?
Use a clear plastic bag or propagator to create a mini greenhouse: place moist paper towels or peat moss in a sealed container, add the stratified pits, and keep it in indirect light. Mist occasionally to maintain humidity. Once sprouts appear (1–2 inches), transplant to soil.
Why did my cherry pit sprout, but the seedling died?
Common culprits: overwatering (root rot), temperature swings, or lack of light. Seedlings are delicate—use well-draining soil, keep temps stable (65–75°F), and provide bright, indirect light. If yellowing occurs, check for pests or fungal issues (neem oil can help).
Can I grow cherry trees from store-bought cherries?
Just clean the pits thoroughly (no pulp residue) and follow the stratification steps. Avoid cherries treated with fungicides or wax coatings—opt for organic or fresh-picked fruit for best results. Pro tip: Try pits from heirloom or local varieties for unique traits!
Wrapping up and next steps
Growing cherry trees from pits is a rewarding journey that blends patience with the joy of nurturing life from something as small as a seed! 🌱 With the right steps—like cold stratification and consistent care—you’ll soon see tiny sprouts pushing through the soil, a testament to your green thumb.
Once your seedlings are thriving, consider transplanting them into larger pots or directly into your garden for a future harvest of sweet, juicy cherries.
Ready to take the next step? Start with just one pit today—your future cherry tree is waiting! 🍒